Setting up a Raspberry Pi network tunnel is an essential skill for anyone looking to enhance their network security or create a private connection between devices. Whether you're a tech enthusiast or a professional, understanding how to configure a network tunnel on Raspberry Pi can significantly improve your networking capabilities.
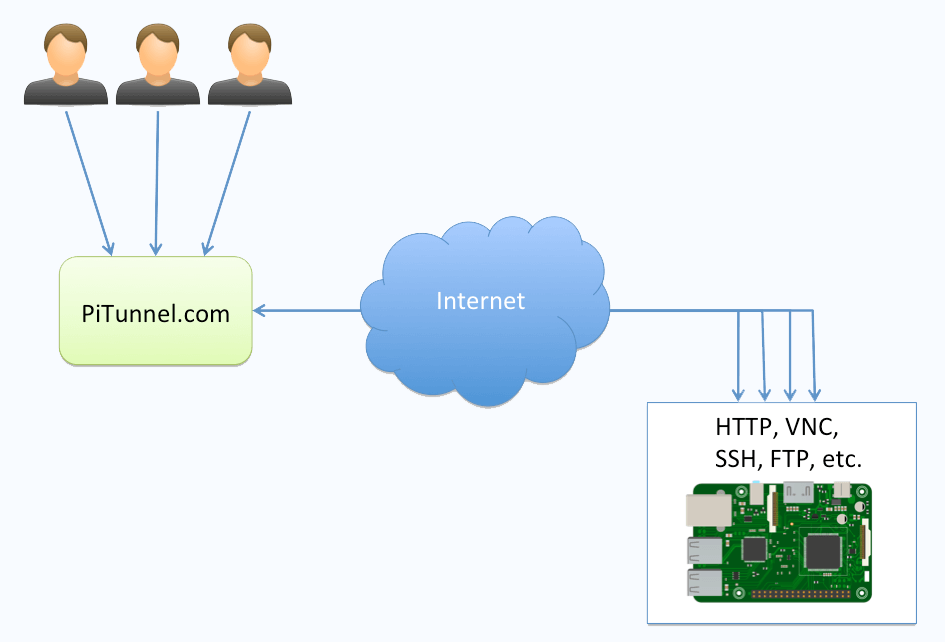
Raspberry Pi has become a popular choice for hobbyists and professionals alike due to its versatility and affordability. One of the many applications of Raspberry Pi is creating a network tunnel, which allows you to securely connect devices across different networks. This setup is particularly useful for remote access, secure communication, and bypassing geographical restrictions.
In this article, we will delve into the step-by-step process of setting up a Raspberry Pi network tunnel, covering everything from the basics to advanced configurations. Whether you're a beginner or an experienced user, this guide will provide you with the knowledge and tools needed to successfully configure your Raspberry Pi network tunnel.
Read also:Unlocking The Magic Of Diva Flawless Video A Comprehensive Guide
Table of Contents
- Introduction to Raspberry Pi Network Tunnel
- Benefits of Using Raspberry Pi Network Tunnel
- Setting Up Your Raspberry Pi
- Installing Required Software
- Configuring the Network Tunnel
- Enhancing Security
- Troubleshooting Common Issues
- Advanced Configurations
- Applications of Raspberry Pi Network Tunnel
- Conclusion
Introduction to Raspberry Pi Network Tunnel
A Raspberry Pi network tunnel is essentially a secure connection that allows data to be transmitted between two or more networks. This setup is particularly useful for creating private connections, enabling remote access, and securing communications. By using Raspberry Pi as the central hub, users can leverage its powerful capabilities to establish a reliable and secure network tunnel.
Why Choose Raspberry Pi?
Raspberry Pi offers several advantages when it comes to setting up a network tunnel:
- Affordability: Raspberry Pi is a cost-effective solution for building a network tunnel.
- Versatility: It supports a wide range of software and configurations, making it suitable for various applications.
- Energy Efficiency: Raspberry Pi consumes minimal power, making it ideal for long-term use.
With its compact size and robust performance, Raspberry Pi is an excellent choice for anyone looking to set up a network tunnel.
Benefits of Using Raspberry Pi Network Tunnel
Using Raspberry Pi to set up a network tunnel offers numerous benefits, including:
1. Enhanced Security
A network tunnel provides a secure connection between devices, protecting sensitive data from unauthorized access. By encrypting data transmitted through the tunnel, users can ensure that their communications remain private and secure.
2. Remote Access
With a Raspberry Pi network tunnel, users can access their devices remotely, regardless of their location. This feature is particularly useful for managing servers, accessing files, or controlling IoT devices from afar.
Read also:How Many Rodan And Fields Consultants Are There A Comprehensive Guide
3. Cost-Effective Solution
Raspberry Pi offers an affordable alternative to expensive commercial solutions. Its low cost and energy efficiency make it an ideal choice for both personal and professional use.
Setting Up Your Raspberry Pi
Before you can set up a Raspberry Pi network tunnel, you need to ensure that your Raspberry Pi is properly configured. Follow these steps to prepare your Raspberry Pi:
Step 1: Install the Operating System
Begin by installing the latest version of Raspberry Pi OS on your device. You can download the operating system from the official Raspberry Pi website and use a tool like BalenaEtcher to flash it onto an SD card.
Step 2: Connect to the Internet
Ensure that your Raspberry Pi is connected to the internet. You can use either a wired or wireless connection, depending on your preference and setup.
Step 3: Update the System
Once your Raspberry Pi is connected to the internet, update the system by running the following commands:
sudo apt update
sudo apt upgrade
These commands will ensure that your Raspberry Pi is running the latest software and security patches.
Installing Required Software
To set up a Raspberry Pi network tunnel, you will need to install the necessary software. The most commonly used tools for this purpose include OpenVPN, SSH, and WireGuard. Follow these steps to install the required software:
Step 1: Install OpenVPN
OpenVPN is a popular choice for creating secure network tunnels. Install it by running the following command:
sudo apt install openvpn
Step 2: Install SSH
SSH (Secure Shell) is essential for remote access and secure communication. Install it using the following command:
sudo apt install openssh-server
Step 3: Install WireGuard
WireGuard is a modern and lightweight tool for setting up network tunnels. Install it by running the following command:
sudo apt install wireguard
With these tools installed, you are now ready to configure your Raspberry Pi network tunnel.
Configuring the Network Tunnel
Configuring a Raspberry Pi network tunnel involves several steps, including setting up the server, configuring clients, and testing the connection. Follow these steps to successfully configure your network tunnel:
Step 1: Configure the Server
Begin by configuring the server side of the network tunnel. This involves creating a configuration file and setting up the necessary parameters. Use the following command to create a configuration file:
sudo nano /etc/wireguard/wg0.conf
Populate the file with the appropriate settings, including private keys, public keys, and IP addresses.
Step 2: Configure the Clients
Next, configure the client side of the network tunnel. This involves creating a separate configuration file for each client and distributing it securely. Use the following command to create a client configuration file:
sudo nano /etc/wireguard/client.conf
Populate the file with the necessary settings, ensuring that it matches the server configuration.
Step 3: Test the Connection
Once both the server and client configurations are complete, test the connection to ensure that it is working properly. Use the following command to start the WireGuard service:
sudo wg-quick up wg0
Verify the connection by checking the status of the tunnel using the following command:
sudo wg show
If everything is configured correctly, you should see the details of the active connection.
Enhancing Security
Security is a critical aspect of any network tunnel setup. To enhance the security of your Raspberry Pi network tunnel, consider implementing the following best practices:
1. Use Strong Passwords
Ensure that all accounts and configurations use strong, unique passwords to prevent unauthorized access.
2. Enable Two-Factor Authentication
Enable two-factor authentication for added security, especially when accessing the Raspberry Pi remotely.
3. Regularly Update the System
Keep your Raspberry Pi and all installed software up to date to ensure that you have the latest security patches.
Troubleshooting Common Issues
Despite careful planning, issues may arise during the setup process. Here are some common problems and their solutions:
Problem 1: Connection Not Establishing
Solution: Check the configuration files for errors and ensure that the server and client settings match.
Problem 2: Slow Connection Speed
Solution: Optimize the network settings and ensure that there are no bandwidth limitations on either end.
Problem 3: Security Alerts
Solution: Review the security settings and ensure that all accounts and configurations are properly secured.
Advanced Configurations
For advanced users, there are several additional configurations that can enhance the functionality of your Raspberry Pi network tunnel:
1. Load Balancing
Implement load balancing to distribute traffic evenly across multiple tunnels, improving performance and reliability.
2. Traffic Monitoring
Set up traffic monitoring tools to track usage and identify potential issues before they become serious problems.
3. Custom Scripts
Create custom scripts to automate tasks and streamline the management of your network tunnel.
Applications of Raspberry Pi Network Tunnel
Raspberry Pi network tunnels have a wide range of applications, including:
1. Remote Access
Enable secure remote access to devices and servers, regardless of location.
2. Secure Communication
Protect sensitive data by encrypting all communications through the network tunnel.
3. IoT Integration
Integrate IoT devices into your network, allowing for centralized management and control.
Conclusion
Setting up a Raspberry Pi network tunnel is a powerful way to enhance your networking capabilities and improve security. By following the steps outlined in this guide, you can successfully configure a network tunnel that meets your specific needs. Remember to regularly update your system and implement best practices to ensure the highest level of security.
We encourage you to share your experience and ask questions in the comments section below. Additionally, feel free to explore other articles on our site for more tips and tricks on using Raspberry Pi for various applications.
References: